
Publish a Swift static website on GitLab Pages
One of the reasons why static websites are so hot right now is hosting prices.
There are many ways to host a static website for free, you can use the free tier of Netlify, GitHub Pages, Firebase Hosting, Amazon S3, and many others. If you already use GitLab to host the code of your projects, you can use GitLab Pages.
In this article, we will set up a new static website generated by Swift Publish and hosted by GitLab.
Create a repository on GitLab
The name and location you use to create your repository that will contain your website source code will dictate the URL of the website in GitLab Pages.
On GitLab.com if you create the project in your user space and name it using your username followed by .gitlab.io, like in [YOUR_USERNAME].gitlab.io, then it will be published on https://[YOUR_USERNAME].gitlab.io. If you name it anything else, like in [ANYTHING_ELSE] it will be published on
https://[YOUR_USERNAME].gitlab.io/[ANYTHING_ELSE].
If you create it in a group and name it [GROUP_NAME].gitlab.io, then the website will be available at https://[GROUP_NAME].gitlab.io.
On a self-hosted GitLab instance, the URL depends on the instance settings. GitLab pages could even be disabled on a self-hosted instance. You should contact the instance administrator if you are in doubt.
In this article, we will create a project named DeliciousRecipes on my user space, so it will be available on https://mvolpato.gitlab.io/deliciousrecipes.
Go to GitLab.com (or to your self hosted GitLab instance) and log in with your account. Click on New Project, type “DeliciousRecipes” as project name, leave the project slug as it is, and add a description. You can create a private project if you want, the visibility of the website does not depend on the visibility of the project.
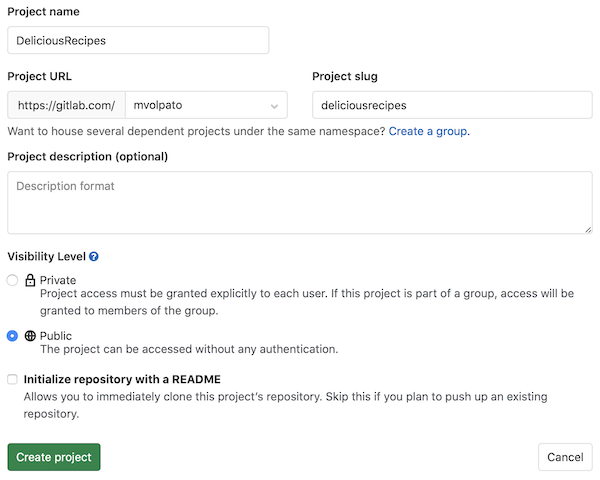
Finally, click Create Project.
Init a new Swift Publish website
To create a new website, we follow the official quick start guide.
Download and build tools
Open Terminal and run
git clone https://github.com/JohnSundell/Publish.git
cd Publish
make
As described in the official guide, you might need to install the Xcode command-line tools:
xcode-select --install
Init your website source code
Create a new folder and run publish new in it:
mkdir DeliciousRecipes
cd DeliciousRecipes
publish new
Now you can run publish run in the same folder, and the project will build, fetching all the needed dependencies. When it’s done, the website should be available at http://localhost:8000. If not, check the logs from the publish run command, it could be available on a different port.
Add GitLab CI configuration
GitLab Pages use GitLab CI/CD to (possibly) build your static website and deployit. We could just use it to deploy the website, but we also want to build it using GitLab CI/CD, because, then, we do not need to keep the compiled HTML and CSS in the repository.
We start by creating a new file, called .gitlab-ci.yml, in the root of our project:
touch .gitlab-ci.yml
open .gitlab-ci.yml
The content of the file should be:
# (1)
image: swift:5.2.4

# (2)
before_script:
  - swift build

pages:
  script:
    # (3)
    - swift run
    # (4)
    - mv Output public
  artifacts:
    paths:
      # (5)
      - public
  only:
    # (6)
    - master
where we instruct GitLab CI/CD to (1) use the Swift Docker container with Swift 5.2.4, which is the latest at the time of writing, then to (2) build the project so that all the dependencies are downloaded.
After the project is built, we (3) run it, so that the static website pages are generated, and we (4) move the assets from the Output directory to the publicdirectory, which will be used by GitLab as the directory containing the assets to deploy.
In (5) we define the path to the artifact generated by GitLab CI/CD. It looks like this cannot be changed to a custom folder.
Finally, we also (6) specify that the website should be published only when we push to the master branch so that we can use other branches for work in progresson the website, for new pages or articles.
If you use the SassPublishPlugin or the MagickPublishPlugin, you can change the Docker image to ishouldgotosleep/swift-publish:latest, which is described in another article, and it includes the tools to run those plugins.
# (1)
image: ishouldgotosleep/swift-publish:latest
Push the repository
Finally, we link the repository in GitLab and what we have been creating locally on our machine. Go to your project page: https://gitlab.com/[YOUR_GITLAB_USERNAME]/deliciousrecipes and follow the instructions in Push an existing folder:
git init
git remote add origin git@gitlab.com:[YOUR_GITLAB_USERNAME]/deliciousrecipes.git
git add .
git commit -m "Initial commit"
git push -u origin master
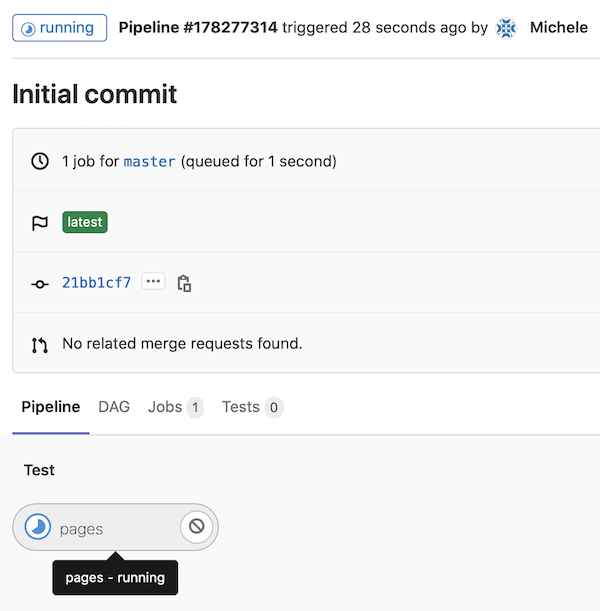
Now if you reload the page you will see that a pipeline is running:

and if you click on the small blue pipeline indicator, you can see that it is a GitLab Pages job.
Click on the pages job indicator to get to the detail page of the job, where you can see what is happening in the Docker container that is generating the website:
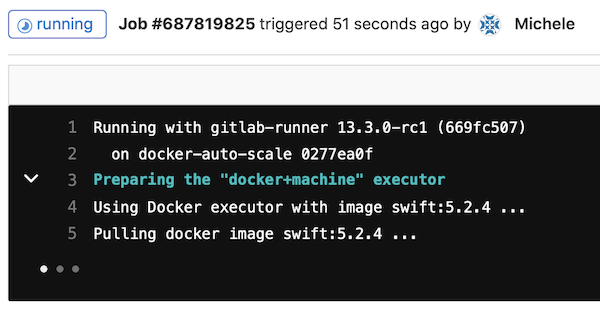
In the picture above, the worker that picked up the pages job is downloading the Docker container that we specified in the configuration file.
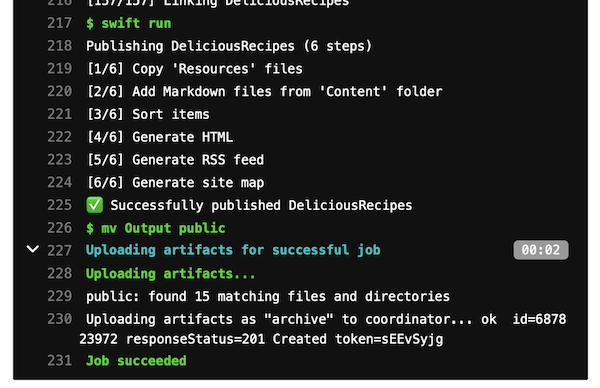
After a couple of minutes the job should be done:
Check the result
Go to https://[YOUR_GITLAB_USERNAME].gitlab.io/deliciousrecipes/ and you are greeted with a webpage without style:
This happens because the default theme does not support (yet) a website hosted in a subfolder. We need to use a different theme. For instance CasperishTheme, by Arnaud Joubay.
Use a different theme
We just need to add the theme to our dependencies in Package.swift
// swift-tools-version:5.1

import PackageDescription

let package = Package(
  name: "DeliciousRecipes",
  products: [
    .executable(name: "DeliciousRecipes", targets: ["DeliciousRecipes"])
  ],
  dependencies: [
    .package(url: "https://github.com/johnsundell/publish.git", from: "0.3.0"),
    .package(url: "https://github.com/sowenjub/CasperishTheme.git", .branch("master")) // <-- added this
  ],
  targets: [
    .target(
      name: "DeliciousRecipes",
      dependencies: ["Publish", "CasperishTheme"] // <-- changed this
    )
  ]
)
and use the example they provide in their GitHub repository in our main.swift:
import Foundation
import Publish
import Plot
import CasperishTheme

// This type acts as the configuration for your website.
struct DeliciousRecipes: Website, CasperishWebsite {
    enum SectionID: String, WebsiteSectionID {
        // Add the sections that you want your website to contain here:
        case posts
    }

    struct ItemMetadata: WebsiteItemMetadata, CasperishWebsiteItemMetadata {
        // Add any site-specific metadata that you want to use here.
        var cover: String?
    }

    // Update these properties to configure your website:
    var url = URL(string: "https://mvolpato.gitlab.io/deliciousrecipes/")!
    var name = "MyWebsite"
    var description = "A description of MyWebsite"
    var language: Language { .english }
    var imagePath: Path? { nil }

    // Update these properties to configure your casperish-website:
    var rootPathString = "deliciousrecipes"
    var headerColor = "#424242"
    var cover = ""
    var author = "Your name"
    var avatar = ""
    var bio = "Bio"
    var icon = "🏝"
    var newsletterAction = ""
    var contacts: [(ContactPoint, String)] { [] }
}

// This will generate your website using the Casperish theme:
try DeliciousRecipes().publish(
    withTheme: .casperish,
    additionalSteps: [
        .installPlugin(.readingTime()),
        .installPlugin(.pygments()),
    ],
    plugins: [.pygments()]
)
Push and visit again https://[YOUR_GITLAB_USERNAME].gitlab.io/deliciousrecipes/ and now a nice styled website should appear.
Ignore Output folder
Now that we build the website in the Docker container via GitLab CI, we can delete the Output folder from the project and ignore it in .gitignore:
.DS_Store
/build
/.build
/.swiftpm
/*.xcodeproj
.publish
Output
Resources
This is a link to the repository used in this article, while at this link you can find the final published website.
The enhanced Docker image, that can use the SassPublishPlugin and the MagickPublishPlugin, can be found on Docker Hub.
Leave a comment